For a video version of this tutorial visit www.proko.com/how-to-draw-ears-anatomy-and-structure
In this tutorial I will go over the parts of the ear and suggest an easy way to remember all these complex shapes. At the end, I will show a step by step of an ear drawing.
Basic Forms
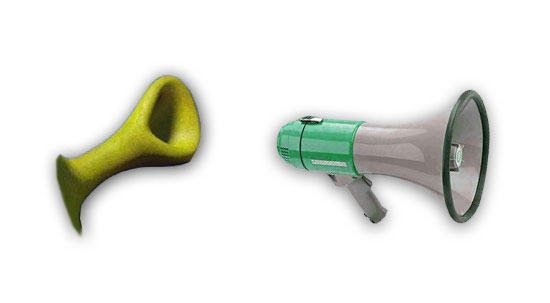
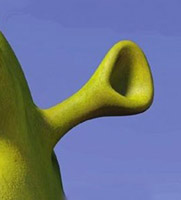
The simplified volume of the ear is very much like a megaphone. This is easier to see from the back, where the concha is like the tubular part and the helix is the lip part of the megaphone. Maybe this explains Shrek’s freakish deformity… I bet the creators of Shrek were thinking of this during the concept designs.
Just Remember “why?”
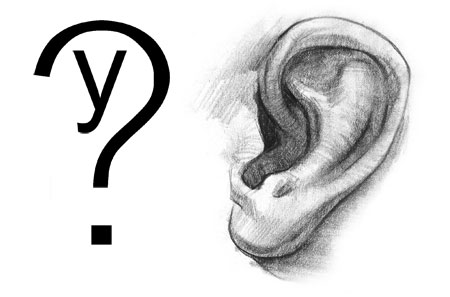
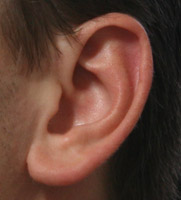
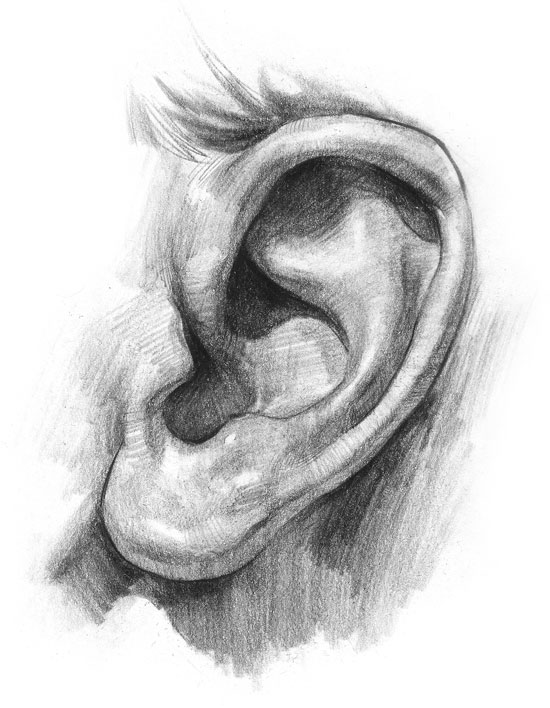
At first glance the shapes in the ear seem random and confusing. There is though, some structure to this madness. A really easy way to remember these crazy shapes is “why?” or “y?”. The outside of the ear is shaped like a question mark with the dot of the question mark being the earlobe. The squiggly part on the inside resembles the letter y.
Placement of the Ears
The ears lie in the middle third of the face. The top of the ear aligns with the brow ridge and the bottom aligns with the base of the nose. Horizontally it’s directly behind the jaw. From profile it sits conveniently on the bottom back quadrant of the loomis ball that I mentioned in the previous post.
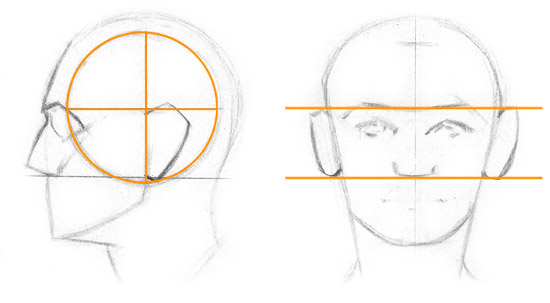
In Perspective
During an up-tilt or down-tilt the placement of the ears is very important since doing it incorrectly can break the illusion of a tilt. On a down-tilt, the ears should be placed higher on the head, while on an up-tilt they should be placed lower on the head.
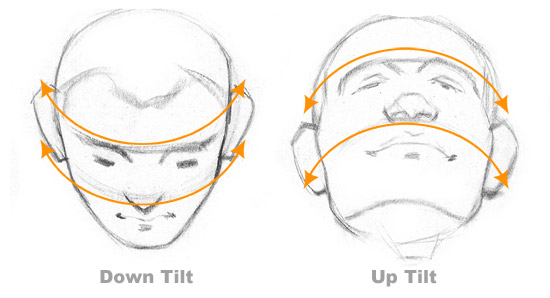
Anatomical Information
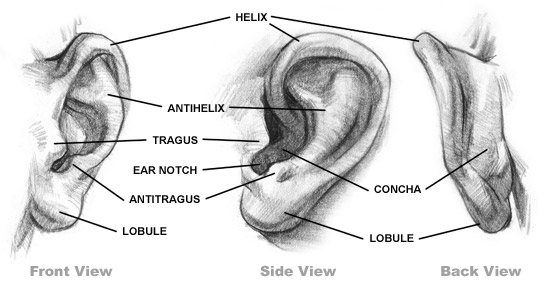
Shading the Complex Forms of the Ear
Concha
The concha is the bowl-shaped part that attaches the back of the ear to the head. You can also see it from the front, directly above the antitragus. Shrek has a diseased concha…
Helix
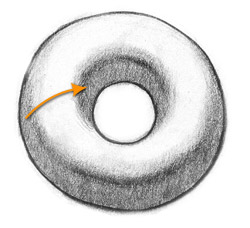
The Helix is a semi-cylindrical form and should be shaded as such. The helix curves over the top of the ear and around into the inside almost completing a circle. This is the hook part of the question mark. When shading a cylindrical volume that forms a loop, think of a donut. Take a look at what the shadow does on a donut.
![]() |
The end of the helix that curves into the inside of the ear will usually be darker then the part on the outside, since it’s on the inside. Imagine the inside of the ear as a dark cave. Obviously this isn’t true of the light source comes from the side and points directly at the ear.
Antihelix
The antihelix is the Y shape inside the ear. At the top, the helix usually casts a shadow onto the two legs of the antihelix. I’ll often use this cast shadow to exaggerate the cylindrical volumes of the antihelix. The upper leg is larger and softer than the lower leg. At the lower end, the antihelix connects to the antitragus at about the same level that the helix connects to the earlobe.
Tragus and Antitragus
The tragus and anti-tragus are like little beads that point at each other. They are separated by a ‘U’ shaped notch in between them.
Lobule
The earlobe is the only part of the ear that isn’t cartilaginous. It’s roughly 1/3 the height of the entire ear, sometimes smaller. The earlobe usually hangs from the ear, but sometimes connects to the jaw.
Drawing the Ear
![]() |
![]() |
![]() 1. Start with the biggest shape of the helix and earlobe. Remember the “?” shape. Get the width to height relationship working so that the ear doesn’t end up too narrow or too wide. Also measure the angle of the ear. It’s usually tilted back slightly towards the top. |
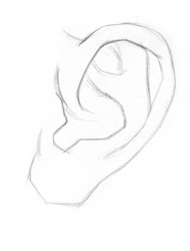
![]() 2. Now I’ll focus on the complex shapes inside the ear. Make sure to consistently compare shapes to the shapes around it. Keep checking angles and the size relationships of the shapes. Breaking up the curves into segments of straights makes it easier to design and draw accurately. It’s ok to exaggerate shapes if you think it will make for a better design. |
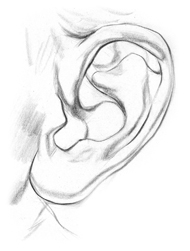
![]() 3. Begin mapping the core shadows and cast shadows. Stay true to the simple shapes you’ve established in the previous step, but add a bit of complexity by varying your line width. Also, try not to oversimplify the core shadows. Look for variation in the edges. |
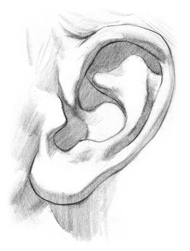
![]() 4. Separate the lights from the shadows. Stay simple and don’t lose control of your values. Try to ignore all the dark halftones and only fill in the shadows. |
5. During the final stage, I’ll add all the halftones, dark accents and reflected light information. Most of the volumes in the ear should be shaded like organic cylinders. Make sure these volumes feel round.
UPDATE – 10-25-2012
Made a video version of this tutorial. Visit Proko.com for more videos.
Related tutorials: How to Draw Lips, How to Draw Eyes and How to Draw the Nose.
i hear your pretty good at this, haa, get it hear, ear. really stan, this is pretty awesome. is there anyway you can make pamphlets of your tutorials that we can purchase and use for reference when out drawing and painting? if so, i would like to buy one of each of the drawing tutorials. thankyou, bb
Hi Stan, another wonderful tutorial! I have linked to this one from my blog as well as your other facial feature tutorials.
Beverly. I am planning on publishing educational books and DVDs in the future. Now, my focus is mainly on this blog and to get my traffic up. It’s much easier to market a book with a high traffic website. For now, keep enjoying my free tutorials!
Awesome tutorials, Stan. You can never have too many ways of looking at the head. Do you have any plans to do one for the hair?
John – Thanks for the suggestion. I’ll put it on my list.
Nice
I appreciate the thorough explanations, clear and excellent illustrations and the logical sequence of your tutorials
Professor Prokopenko,
I have improved my drawing skills, a lot, with your tutorials. Thanks.
I would like to undestand how to paint. I tried painting a portrait last weekend, but I didn’t succeed. Could you help?
Issa
Susan – Thank you!
Issa – Unfortunately the only way I can help you through a short comment like this is to recommend a good book and video. If you want to become a professional painter it’s very important to study with someone who can work on your painting so you can watch them correct your mistakes. Try to find an atelier near you. ARC has a good list:
http://www.artrenewal.org/pages/ateliers.php
Book – “Alla Prima” by Richard Schmid
Video – “Homework” by M. Weistling. You can find it on the liliedahl website:
http://www.lilipubsorders.com/
or rent it at smartflix.com
Hi,
Thank you so much for this tutorial, I have enjoyed it very much and learned a lot just from reading it through. I feel more confident that I can grasp the basic shapes and am looking forward to being able to put pencil to paper and practice.
I look forward to discovering your other tutorials.
Hi Stan! Excellent tutorial! Just one thing, could you tell us what kind of pencil and paper you used for this ear drawing? It is very crisp and sharp, I cannot seem to replicate this effect with the pencils I have at hand- it all comes out too murky.
You’re the man Stan!
It’s 2AM and your tutorials are what have kept me awake for so long. These are so helpful, I really appreciate the effort you put into posting these! =D THANK YOU!!!
thanks
Wow, just wow.
Wonderful job on those ears! =)
So funny pic! Thank you
I use conte charcoal pencils on newsprint.
Hi! am just really learning how to draw. I have a freehand class this term and I know I just won’t survive my prof’s crazy demands if it weren’t for awesome internet tutorials. This is quite an informative tutorial! thank you so much!:)
We have added this tutorial to our forum. Than you Stan!
http://outcaststudios.com/forums/index.php/topic/9081-weekly-skills-challenge-vol-1-3/
Visit: http://sweattshop-graphic-artist.blogspot.com/
THAT IS A BEAUTIFUL EAR!
Hey there
I would like to say thanks to your tutorial for they have improved my drwaing skills a lot. Lately, Ive found myself bookmarking your site so It could serve as a reference when I draw something. And once again, thanks for this great share.
this is sound advice, I really hear what you’re saying. If only I had listened to my art teacher more I would have heard what she was saying about drawing ears.
Wonderful site with much clarity. Thank you for sharing your talent.
It is so wrong to simplify drawing like this. You have to draw what you see, not what you think you see
This is a wonderful site. Very easy way to teach art. It has helped me a lot to tech my students how to understand the anatomy of the human face.
Thank you very much for sharing your knowledge and revealing the secrets of drawing!
Mulugeta
Also ich bin der Meinung dies ist eh lediglich ne kurzweilige Erscheinung
Hi there. I am not an artist. Unless stick figures count.
I work for an audiologist and was wondering if there was any way we could use this sketch of the ear on our website. Not as our logo, but as a side image.
You have WONDERFUL talent!
Holly, feel free as long as you give credit and a link back.
I’m glad you liked my drawings!
Hey, nice tutorial…..BUT those aren’t the anatomical names. Those are the peircing names. Just saying.
Carr, could you be so kind as to point me in the right direction? I referenced many anatomy books for the names. Where can I find the right anatomical names? Thanks for your help!
i’m a art teacher and jaz want to thank you for your drawings, it help me a lot.
million thanks !!!!
Awesome!!
Thanks! You made my class assignment easier to understand.
This is the best tutorial on the ear that I’ve ever seen. I found it most helpful, and I’ve been painting ears for awhile; stumbling along, trying to make them believable. Thank you so much for this!
First off all thank you for your tutorial, my knowledge of how to tackle the facial features you’ve placed here on your site has grown alot by reading your tutorial. Im aspiring to be a digital artist and one day a graphic designer and if you can include how to draw facial structure from different angles It would complete my circle. Thanks MUCH.
Wıcked! BEST!
I LOVE LOVE LOVE your tutorials! The little tricks you add (like the Y in the ? for the ear) and the ‘can’ for the lips…everything…it’s really superb!! masterful!
Thank you. I found this very helpful in my endeavors.
i’d like to point out that using the eyebrows as a measuring line for the ears doesn’t work when there’s variation in how large the brows are and how far away they are from the eyes.
the corners of the eyes and top of the ear (where it connects to the head, not the tip) are a much better marker. same with the base of the nose (not the tip) and the bottom of the ear (again where it connects to the head, not the lobe).
thx
THANK YOU SO-O-O- much. The instruction you give is the direct without distractions. I might actually survive art class because of these videos !
Wow! this really helped, when I try to draw ears they really don’t look like ears. This tutorial has really helped!!!
Thanks, and best wishes!!!
Very well your tutorial proko! It seems like Andrew Loomis method but more fresh!
Gracias!
i love your drawing, you are an awsome artist! but could you explain the direction more clearly? it would help alot! thank you!
Hi Stan maybe you could do hair or make the steps go a bit slower
Thanks Holly
You are the best in the crows. I mean you are have very good way to teach drawing human face from very basic steps. You got it. You are a amaze instructor. Thanks a lot.
I loooove this totaly. I am crazy about drawing. Thank you , thank you…keep up the good work!
Felicitaciones Sr. Proko por traernos estas magistrales enseñanzas de com dibujar…la verdad es que entregan una muy valiosisima informacion de como dibujar…esta todo muy bien explicado de una forma simple y clara para unamante del retrato como yo es mas que interesante toda estas clases MUCHAS GRACIAS ….Y FELICITACIONES,,,,,
excellent
Excellent tutorial. Thank you.
Thanks for your help, I have problems drawing ears at an angle, such as maybe 3/4 view, do you have suggestions
I suggest you study the forms I explained in this tutorial and then take some pictures of someone’s ear from various angles. Then draw them focusing on how the forms change from one to the other. Pay attention to the overlaps between the forms.
great explanation
Its super cool n very helpful! the five steps you mentioned is the best and easy way to draw, my mam gave me assignment as a punishment and ur tutorial helped me alot! thankyou stan.
A punishment? You’re lucky to be getting such great punishments!