
The Basic Forms
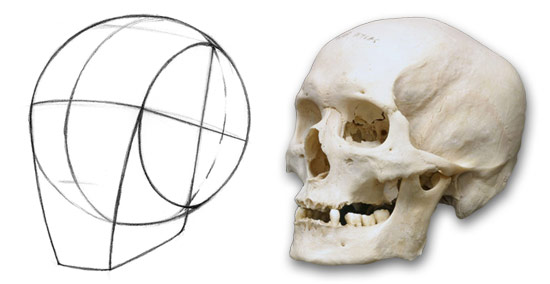
To draw the head from any angle you must first understand its basic structure. Look past all the distracting details and visualize the underlying forms. This ability to simplify can be applied to the features of the face, but when starting the drawing you could look even further. Ignore even the features and simplify to the most basic form of the head. I use a method taught by Andrew Loomis in his book, “Drawing the Head & Hands”.
The head deconstructed into its basic forms, is a sphere as the cranium and a block as the jaw and cheek bones.
![]()
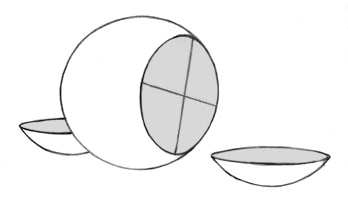
A Sphere as the Cranium
The sides of the head are flat, so we can slice off a piece from both sides of the ball. From profile, this plane will be a perfect circle, but when drawing it from any other angle, it will appear to be an oval because of perspective. Divide this oval into quadrants. The vertical line represents the beginning of the jaw. The horizontal line represents the brow line. The top and bottom of the oval help you find the hair line and the bottom of the nose.
![]()
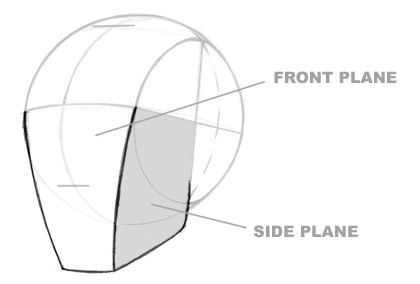
A Block as the Jaw and Cheek Bones
Attach the shape of the jaw. The top will start at the brow line and the back will start at the center of the oval. This is a 3-D volume with a front plane, side planes, and bottom plane (bottom plane is seen from some angles).
![]()
Constructing From Any Angle
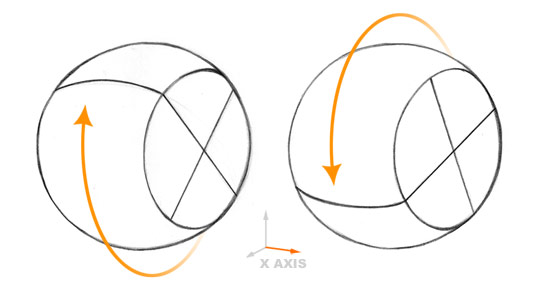
Step 1 - Determine the angle of the ball
The angle of the head is established at the very beginning of the drawing with the ball. All three axes must be addressed:
X Axis - The up and down tilt is established by the angles of the horizontal and vertical lines in the oval. Also, on extreme up tilts and down tilts, the thirds will be foreshortened because of perspective.
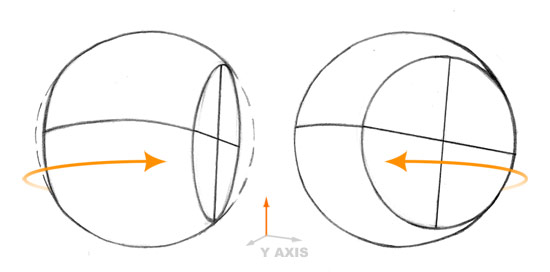
![]()
Y Axis - The direction the head is turning (left or right) is established by the width of the oval. As the head turns towards you, you can see more of the front of the face and less of the side, so the oval representing the side will get narrower. Similarly, when the head turns away from you, more of the side plane is revealed and the oval will appear wider.
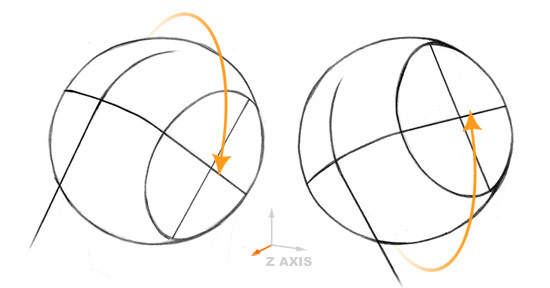
![]()
Z Axis - The twist is established by the angle of the center line, the angle of the oval and the placement of the oval on the ball.
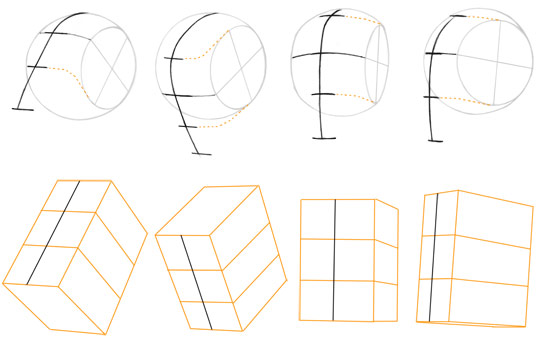
![]()
Step 2 - Find the thirds
After establishing the angle of the ball, divide the face into thirds. The distance between the hairline and brow-line should be the same as the distance between the brow-line and bottom of the nose. Add that same distance to find the chin. Notice how the hairline and nose-line align with the top and bottom bottom of the oval when wrapped around the face. Imagine the head as a box. The thirds must be wrapped around the side plane and front plane.
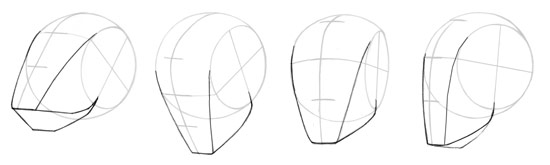
![]()
Step 3 - Add the jaw
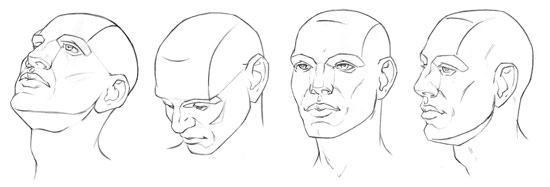
A common mistake at this point is to make the jaw too long in comparison to the ball. Make sure to measure your thirds correctly and that they relate correctly to the ball. Notice how the shape of the jaw changes from various angles.
![]()
Step 4 - Add the features
With this basic structure properly established, it becomes much easier to add the features in the right place. Check back for more information about specific features in a later post.
![]()
- How to Draw Eyes
- How to Draw the Nose
- How to Draw Lips
- How to Draw Ears
* * *
Practice inventing the head from all possible angles. Get a sketchbook and fill an entire page with little heads. When drawing without reference photos, you quickly realize where your weaknesses are because you can’t rely on copying. You can only work with what you know.
Email to a Friend
Get Email Updates: Don't Miss New Tutorials


68 Comments:
Great idea to show skull & line drawing comparison
I found this useful in understanding the underlying form & volumes.
OK, this is extremely clear and direct. I read the tutorial and then I sketched and took notes from the tutorial in my sketch book, this helped a great deal as it confirmed areas I did or did not understand.
Next I invented angles (ups, downs, and twist combinations) to confirm the knowledge. Stan, you did great, the tutorial brought me furthest along than any other reading of this subject to date. Your skill and clarity in communicating this is exceptional.
Wow bev, thanks for the warm compliments.
I like how you took notes and then actually applied the information. Very important to retain what you’ve learned.
Thanks so much for this tutorial. I have many drawing books, including those by Loomis, but none of them explained a clear method for drawing the head at various angles. Without this tutorial I would still be struggling so thanks again for the explanation.
nice work
I agree with Rochelle ideas,although reading many books which has no assistance to me.
Your explaination is very concise and easy to learn.
Good jobs.
Thanks guys! Keep studying those Loomis books though. They’re filled with great information.
Finding a brow line and a face center lines is easy - you just make them up and make them look kinda perpendicular to each other. I’ve got that - great explanation. But one question I find more difficult - any tips on how to find the size and location of side ellipse? I mean, when you say “we slice off a piece from both sides of the ball”, how do you find exactly how much and where to slice off?
Ivan - GREAT QUESTION! The oval begins at the side plane of the face. The best place to see this side plane is the edge of the forehead. First, I measure the width of this oval and then try to fit the largest possible oval within that area. You will end up with a little bit of space above and below the oval to the edge of the ball. That’s normal.
But remember, it’s not a perfect science. Head shapes vary from person to person.
This tutorial is simply brilliant. ‘Nuff said.
(Okay, maybe not enough)
Before now I have always been limited to drawing the basic 3/4 pose in my cartoons. I spent twenty minutes practising this method and now I’ve got my characters jumping around in all kinds of positions.
Really nice job on the tutorial Stan. After looking at dozens of different books, videos and websites for tips on drawing the head, this one is definitely the best I’v seen.
thanq for this site………….thanks a lot.
Very nice tutorial!
Started practicing and finally got things to work again. I’ve been “out” for several months, bu this really set me back on track.
In comparison to most books this tutorial really highlights the importance rules to draw the basic shape. Definatelly the best!
This is a great tutorial. I’ve been poring over Loomis’ head books for some time and lately I have been having a heck of a time getting the basic structure down. Using the cross on the cut-off plane is brilliant.
However, I am having trouble following your response to IvanD about where to place the “slice”. You are placing it based on the forehead, but beyond that I am not following your description. Could you talk about the side oval a bit more?
Thank you so much!
To clarify, I should sat PLACEMENT of the side oval.
Thanks again, this is an awesome break down of Loomis’ method.
Hi Stanislav great turorial, can I translate it in my language ? (ITA) for my blog
thanks
paskuale,
That is ok. I sent you my conditions in an email.
thanks
Thanksssssssssss
Richard - many people have a hard time understanding the oval. where do you place it and how big? I might write another post about it in the future or include a better explanation in a portrait book I’m writing. Can’t promise anything soon.
The best I can do in a comment is to mention that the width of the oval depends on the twisting (y-axis) of the head. Find the part where the forehead begins to become the side of the head - this is where the side of the oval starts. The height of the oval is always the same. Refer to the Loomis book to see the relationship between the ball and the oval.
Hope this helps!
This was really helpful! I could never find any clear tutorials for head angles. Thank you so much for making this!
This tutorial has inspired me to start drawing again!
I was never taught a simple way to draw angled heads so I’ve stayed away from drawing people at all costs! Now it’s a piece of cake!
Thank you soooo much!
This help to the poin that I no longer have to “improvize”…
It REALLY pays off to pay attention in anatomy class! But again, you have simplified it in a very digestible form…
Being someone that wants to work in the comic book industry, I think this tutorial was VERY helpful. I feel like I got screwed out of learning good principles for the head, and this really helped me understand more. Could you by change do a tutorial on feet and hands/arms?
Woow !! I found it was help me a lot. Thank you for making these tutorials!
woah. nice tutorial. very helpful indeed.
with this explaintion,I can understand loomis’ method more clearly .Thanks a lot!!!
In drawing number four, it seems the teacher has the concept of ovalness wrong, it is a vertical, not horizontal oval when the sides are cut off. The heads models at the end and so on, are all correctly drawn…
I could explain this easier if I could draw here. your work is excellent…
If you like the tutorial..read the book. It is enlightenment to the creative for sure.
Hey, I just stumbled on to your site, but I’m very glad that I did because, you are the only one who has been able to convey to me how to understand the human head as a 3d form, and I really want to thank you for that. I’ve been looking in books and online trying to understand it for so long and now I finally do. Thanks!
I think this is helpful, thanks.
Excellent explaination of the angles. Cannot find this in other books
Thanks!
Nice succinct explanation!
This is awesome. thanks for posting this i’m goin to use it alot.
Hey Stan
thanks a lot for your nice explation of the method of the andrew loomis approach
Great tutorial! Really helped me find the form of the head!
Only problem is that I having trouble using it and keeping my heads from looking too rigid and mechanical. I’m also not totally sure how to use it for softer female faces. I’ll have to play around with it until I find out.
Thanks again!
This was extremely helpful to me, thank you!
I had been searching the net looking for a method that would allow me to draw the head in essentially any pose but I had a lot of trouble finding anything. So many sites are simply trying to give you a recipe for drawing eyes at such-and-such a distance from the bottom of the nose and la la la, elementary school art class stuff. This simple method helped more than any of that!
why not get Andrew loomis drawing the head and hands book
he is very agle
Thank you so much for this tutorial it has given me a better understanding of drawing the head. Practice makes perfect and that is what I will be doing with your help. I can’t thank you enough. Thanks again!!!
tis is a perfect subject and i really liked it
Great Blog Stan! Thanks for all the info
I am a professional artist and this is good instruction. Congratulations.
Do you have anything on how to draw noses from an angle for cartoons? I can’t seem to find ANYTHING for it…
Do you have anything on how to draw nose angles for cartoons? I can’t seem to find anything like that on the web…
I have a question.
Especially on female heads, at angles such as 3/4 views, you will see the contour of their farthest cheek. This construction method accounts for the bone structure itself, but not the flesh padding.
How does one know where to place the cheek?
Thanks for the great tutorial, BTW!
Jojo, great question!
I usually start with the average line that I’ve shown in this tutorial to get the basic angle. Then I will add the contours of the brow ridge, cheek bone, muzzle, and chin afterwards. Those contours change a lot depending on the person’s type. I do it mostly through observation.
The cheek bone usually fits in the middle third of the face. Relating it to the placement of the nose helps me.
Susie, I don’t have anything on this site specifically for cartoons. Try searching for tutorials on caricature. You might find some good info.
Thanks for the response! Helped me out a lot!
I am always looking for different ways to direct my students in the process of drawing. By far, your tutorials have been THE most useful. I refuse to share with my students the ideas and concepts of any mediocre artist. GREAT WORK!
CMagellen - Thank you! Glad my tutorials are helping your students!
I have the Andrew Loomis Head and Hands book but I can’t understand one thing: starting the head as an oval/ a whole. I understand that for this the eyes become the half way point, but what about the placement of the nose and chin? Is the nose halfway from the eyes and chin? Or are the measurements different?
Thanks
nice hey!
this is a brilliant lesson on different angeles of the face and how to approach the drawing of them it is such a help as I am studying portraiture thank you
Hi Stan - I’m teaching myself to life draw correctly, in part using Loomis’s instruction, and just found these tutorials - I’ve seen a lot of tutorials and these are great. Could you tell me what kind of pencil you use? Loomis uses something similar, it looks like something that’s soft and dark without being smudgey like charcoal. I’m intrigued! Many thanks.
kp, i actually do use a charcoal pencil on SMOOTH newsprint when drawing from life. Specifically, Conte 1710 Black B or 2B.
Don’t flatter yourself. All the comments likely come from established experts who didn’t need this grossly simplified tutorial or people who’ve yet to try it, it isn’t useful at all.
The oval indeed gets more narrow as you turn at certain angles, this is an obvious slice of fact you numbnuts but you don’t tell them exactly how narrow it should be at every angle as we don’t all have 3D models running in our brain.
If this requires a tool you should’ve fucking said so.
This might be useful for geometry majors or people who’ve had it explained to them better than you did but that’s what the problem is. You don’t explain why it’s a perfect circle at certain angles, there are some arbitrary trace out lines in some examples (like the segmented line in the first drawing) you don’t explain the purpose of…
Deliberately made to be confusing and yet simultaneously inaccurate, you don’t help us draw certain features or even give us a front profile so we know exactly where this rhetoric sphere should be cut.
it is very helpful for the art students on there subject of applied art students. and this is very helpful to me as well cause i am an art student so it is helping me very much by reading this it is easy for me to make an human skull.
thank you very much.
Hmmm, good tutorial. I can’t stop thinking that the jawline is extended too far back on the head that’s looking down, though.
Confirm/Deny?
“Thisisashittytutorial”, you are a douchebag! Either you are a crappy artist or have a personal axe to grind with the author - or both. He merely clarified Andrew Loomis’s technique. And the level of the tutorial clearly says beginner. Let’s see your link where you do better. Put up or shut up.
Matt - maybe a little bit
It is very helpful for us.Thank u for this help.
I got a lot more out of this tutorial as far as the breakdown of the sckull. I think that your explanations are a lot more simplified and more understandable than in some of the books I have read especially the way you slice off the sides of the sphere to make the cranium. I also took some notes and applied it to creating different angles myself and have been practicing and I can see a difference in the way I can draw the head now. Thank you.
Valuable info. Fortunate me I found your website by accident, and I am surprised why this accident didn’t took place in advance! I bookmarked it.
you’re confusing the crap outta me. Is the reason you’re heads aren’t appearing to be equal in half in half ratio because of the angle their at?
yes
How about from the back of the head, straight on or slightly toward
one side or the other? Yes, sometimes you DO need to put a life-like
back-of-the-head into a picture with several or many figures in it. How do you do it?
perfect thanks
This is way cooool!!!!
If your looking for tips on how to draw realistic faces.. I also found them at this site.. http://www.drawrealisticface.com , great stuff as well..