Looking back at my tutorials on drawing the head, I realized that I covered individual features, but completely left out hair. This tutorial will is split into 3 parts: The Basics, Types of Hair, and a Step by Step drawing. I’ll start this first part of the series with common mistakes that I see all the time.
Common Mistakes when Drawing Hair
Forgetting about the volumes
This is the most common mistake I see from newer students. There are over 100,000 strands of hair on our heads. This thought can be very distracting from the goal of 3-dimensionality. So, some people forget about volume and draw a bunch of lines. But, lines don’t create the illusion of volume. Gradations and value differences that show plane changes create the illusion of volume. Don’t draw a bunch of lines. Instead, focus on the volumes to get a neat style long hair.
Too Much Texture
This one is similar to the first, but this can still happen even if one pays attention to the volumes. Too many repeating lines everywhere (in the lights, halftones, and shadows) can get very distracting. There need to be areas of rest, especially since you want the focus to stay on the face not the hair. I usually show the texture of the hair in the lights and choose to keep the shadows simplified. But it depends. If I’m drawing blonde hair with a strong light source, I might choose to blow out the lights and show the texture in the shadows.
Impatience – Bad Design
There are so many random little shapes in hair, that good design is a necessity. All the shapes can be intimidating and it’s easy to get impatient and sloppy. I’ve found that confidence is an important element for good design. Approach the hair with purpose and a sense of know-how.
Sharp Outlines
I’m referring the the outer edge between the hair and background and also the connection between hair and skin. Unless the subject has a perfectly combed or gelled hairstyle, there will be stray strands that soften the edge between the background. But even if I see a sharp outlined edge, I will cheat in softer edges for variation. This also adds depth and atmosphere and connects the subject to the environment. Variation in edge is also important in the areas connecting the the skin. Drawing a sharp outline will make it look like a wig or a clip-on beard.
Consider the Form Underneath the Hair
Spherical Skull
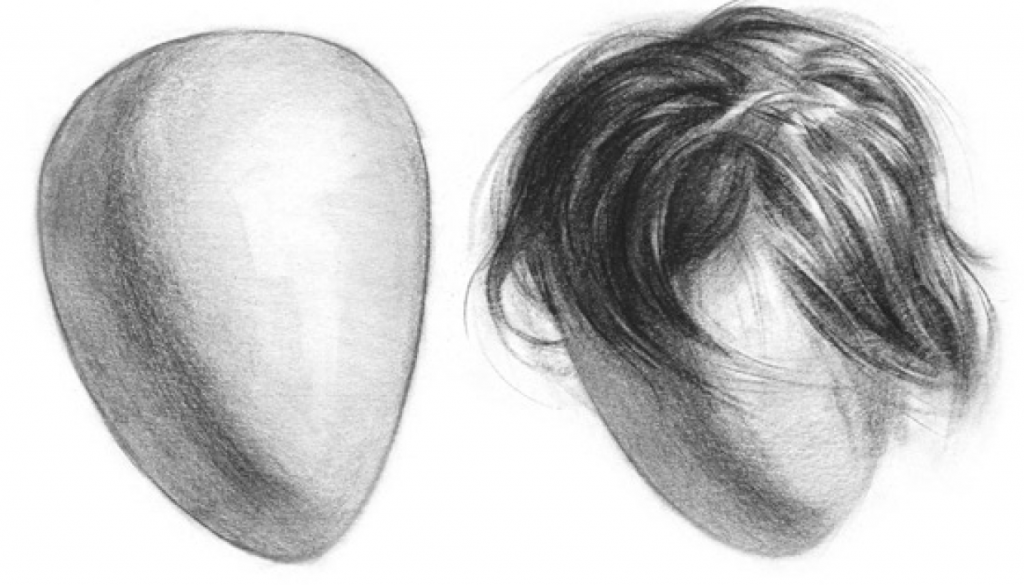
Most hair styles you will draw will be affected by the skull underneath. So, it’s important to think of the ball when working on the overall value changes.
The groups of hair wrap around the form underneath and inherit the same light patterns
The groups of hair wrap around the form underneath and inherit the same light patterns. In the example below, I made sure to shade the large group of hair to resemble a ball, before I added all the texture on top. The left side of the hair mass is all shadow, while all the highlights are on the right:
If you’re drawing hair other than the hair on someone’s head, like a beard or an animal, consider the volumes underneath. For example with a beard, think of a block with a front plane and two side planes.
Adding Volume to the Hair
Hair strands are grouped together into locks. Very much like ribbons. It’s important to simplify and think about the geometric shape of the locks, before adding the texture. Adding the texture of the strands should not take away from the illusion of volume. We can simplify a lock of hair into its basic form using 3 essential elements: highlight, halftone and shadow.
Here’s an example of a lock of hair simplified to its basic form:
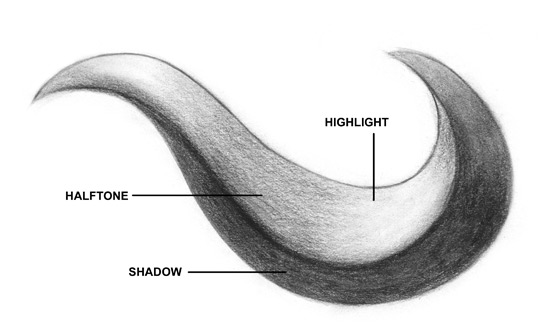
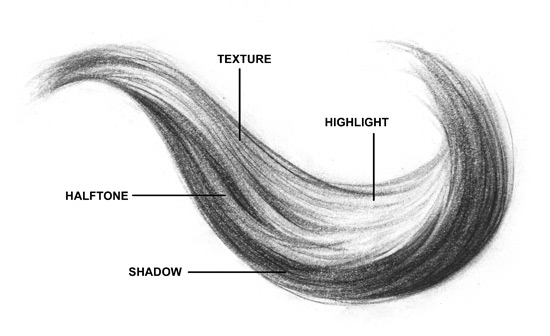
It doesn’t look like hair, but it does look 3-dimensional. To make it look like hair we need to add the 4th element of texture. This includes the separations between the smaller groups of hair, a few lines representing strands, and breaking up the contours. Now that we’ve established the 4 elements necessary to create the illusion of hair, let’s look at each individually:
Shadow
Whether you are drawing straight hair, curly, wavy, short, spiked, or dread locks, there will be shadows. I like to approach shadows first with flat graphic shapes. It’s important to get an attractive, well balanced separation of light and dark before beginning to render/shade. Try to find ways to connect as many shadow shapes as you can. Even with curly hair, where you have a lot of little shapes, it’s important to connect them. Otherwise you’ll have too many floating shapes which can be distracting. This goes back to good design.
Halftone
When drawing hair I first think of halftone as a gradient between the shadows and highlights. Later on this is where I’ll add most of the texture to separate smaller groups and strands.
Highlight
These are the shapes that will be most eye-catching, so good design is most important here. Same principles apply to highlights as shadows. Try to connect them as much as possible only leaving a few lonely highlights. And try not to make each highlight the same. Give them variety in length, thickness, edge, and value.
Texture
Some tips when drawing the hair texture:
- Get the illusion of the strands. Don’t try to draw every single strand.
- Have confidence with every stroke. It’s better to draw a quick confident strand slightly out of place, then a wobbly stroke in the right place. Don’t be timid. This happens when drawing strands that drop down the forehead. People don’t want to mess up the face. But, it doesn’t matter if it’s in the perfect spot… Hair moves.
- Start the stroke at the root and let it taper towards the tip.
- Generally, lines should be lighter and thinner at the highlights.
- If working with graphite, use a combination of softer duller pencils and harder sharp pencils. For example a dull 4B for larger soft gradations and a sharp HB for more defined shapes. Watch out – sometimes a pencil that is too soft will cause the texture of the paper to show through. This ruins the illusion of hair texture, since hair texture is made of long flowing lines and paper texture is usually small repetitive dots.
Part 2 and 3 coming soon. Look forward to ‘types of hair’ and a step by step tutorial.