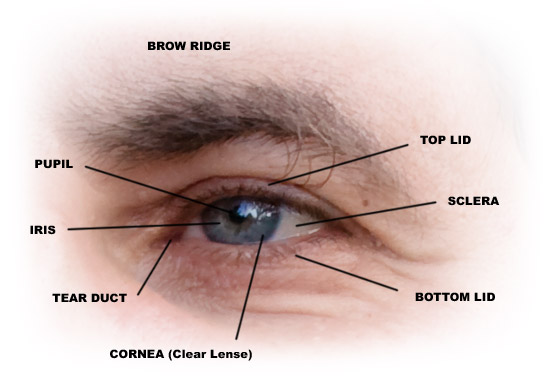
In this tutorial I cover how to draw the structure of the eye and it’s anatomy. The eyeball, eye socket, brow ridge, eyelids, tear duct, sclera, iris, pupil, cornea, glabella, and epicanthic fold.
For more video tutorials visit www.proko.com and subscribe to the newsletter
I will go over the structure of the eye and detailed information on drawing the brow ridge, eyeball, eyelids, eyelashes, iris, cornea, and pupil.
The Basic Forms
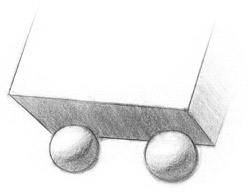
As with the head, it’s important to understand the basic structure of the eye and the brow ridge. The brow ridge can be simplified to a box tilted back slightly. The front plane of the box represents the forehead and the bottom plane represents the plane directly beneath the eyebrows. The eye itself is a simple sphere that sits under this box.
The Eyeball
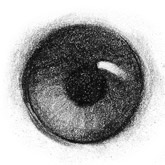
The part of the eyeball that is visible (technical term is Sclera) is commonly called the ‘white of the eye’. However, a common mistake is to literally make it white. The eye ball is a round volume and it needs to be shaded like one. Depending on the light source, usually a gradient on one side or both will do the trick.
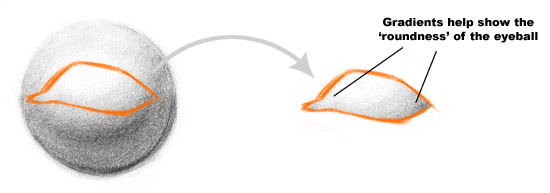
The biggest mistake you can make is to leave the ‘white of the eye’ white, when the entire eye is in shadow. That makes it look as if the eye is glowing. Not good…
The Iris, Cornea, and Pupil
Structure of the Iris and Cornea
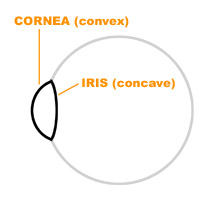
The iris and cornea sit on the eyeball like two bowls. The iris is a slightly concave bowl (like a crater) and the cornea is a convex bowl (like a hill). The cornea is much like a transparent contact lens, so the iris and pupil are visible behind it.The shape and angle of the iris is commonly overlooked. It will only be a perfect circle from front view. When the eye moves around, the shape becomes an oval and the angle changes depending on the direction of the gaze:
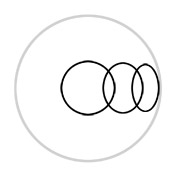
The further the iris is from center, the narrower the oval will become.
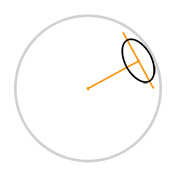
To find the angle of the oval, draw a straight line from the center of the eyeball to the iris. The angle will be perpendicular to this line.
The Pupil
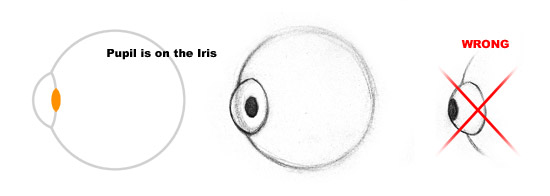
It’s important to remember that the pupil is on the iris, not the cornea. In fact, the pupil is a hole in the iris that lets light in. The pupil dilates to let in more light and contracts to let in less light. So, when drawing the pupil from a side angle, be sure to draw it on the iris.
Shading the Iris, Cornea, and Pupil
Understanding the structure of these forms is important for when you start shading them. The pupil is easy. Its always a black dot on the iris. When we describe the color of someone’s eyes, we are describing the color of the iris. The iris must be shaded like a concave form. If the light source is from the top, the bottom of the iris will be lit. If the light source is from the left, the right side of the iris will be lit, and so on… The cornea will be the exact opposite, because it is a convex form. This is easier to understand with an image:
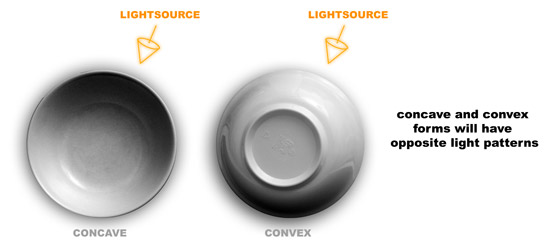
Since the cornea is transparent, the only part that will be visible is the highlight. So, an easier way to remember all this is… The highlight on the cornea will usually be on the dark part of the iris.
The Eyelids
Eyelids Are Not Flat

Try not to draw the eye lids as if they are flat on the face. The eyelids must wrap around the eyeball. Think of two beanies on a soccer ball.
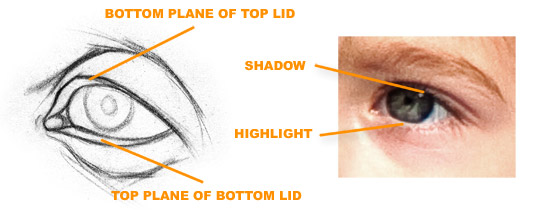
Also, the lids have some thickness to them, so showing the bottom plane of the top lid and the top plane of the bottom lid is very important. If the light source is above the eye, as it usually is, the top lid will have a shadow on its bottom plane and the bottom lid will have a highlight on its top plane.
The Shape of the Eyelids
The shape of the opening between the eyelids is one that confuses most of us at one point or another. It’s complex and it changes as the eye moves. From the front, in a relaxed position, it looks something like this:
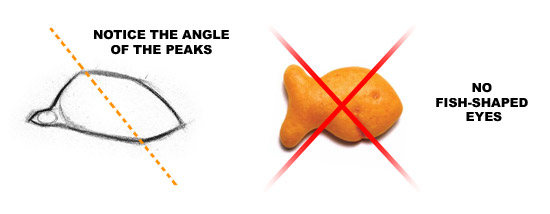
Notice the angle of the peaks. The top lid peaks closer to the nose, while the bottom lid peaks closer to the ear. Do not draw a generic goldfish cracker. The tear duct shape also adds some complexity. It is not centered between the lids, but is a bit lower towards the bottom lid.
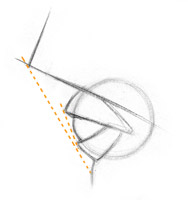
From the side, the shape resembles a triangle with the cornea poking out. The tear duct is hidden at this angle since it is behind the eyeball.
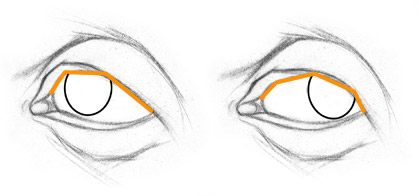
Another factor that will change the shape of the lids is the cornea. Since it is a convex form, as the cornea moves it will push the lids out. Notice how the shape of the lids changes as the eye moves.
Eyelashes
The trick with eyelashes is to simplify them. I like to group them together into chunks and draw them as simple dark shapes. From the front, the dark shape of the lashes will merge with the dark shadow under the top lid. If the lashes are long and curl up enough to be seen as individual lashes, still try to simplify them rather than drawing each lash. I like to draw them blurry as if they are out of focus. From the side, the shape is like a curly triangle.
The Brow Ridge
The brow ridge acts like an awning to protect the eye. Similarly, the top lid extends forward further than the bottom lid.The eyebrows sit on the brow-ridge and peak towards the outer end. The outside ends tend to be lighter, thinner, and have less hair than the inside ends. The shape of the eyebrows varies from person to person. Men tend to have fuller and straighter types while women have thinner types that peak higher.
